
Every game has a goal, and that goal is to usually win! In chess players have the goal of winning as well - to do some players will create an "inescapable check" or checkmate on their opponent's King.
There are 2 critical components of a checkmate - first, a King must be in check - i.e. seen by or attacked by an enemy piece.
Secondly, the King cannot escape check by either Dodging into a Flee Square unseen by the enemy, Apprehending the piece spying the King, or Disrupting the attacking piece's view of the King by placing a defender between the King and attacking piece.
If a player creates an "inescapable check" or checkmate they are the winner of the game!
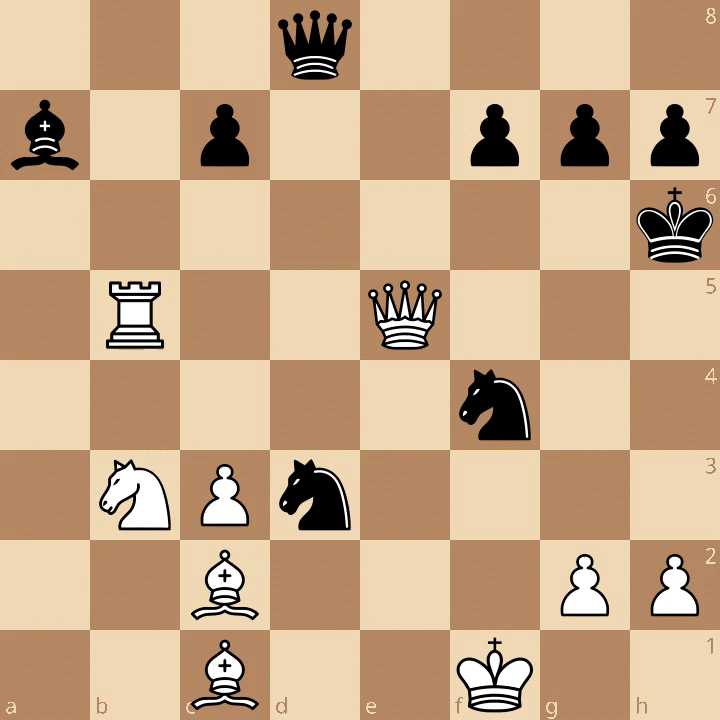
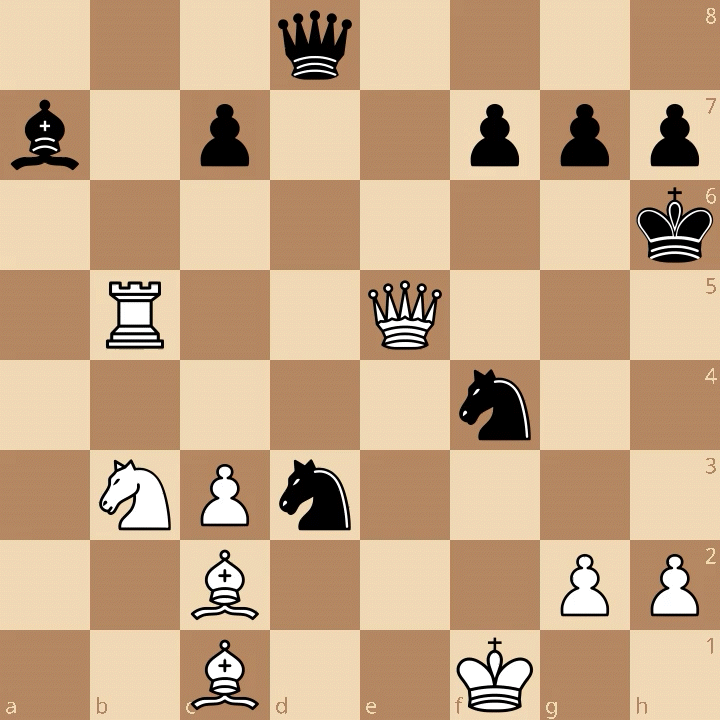
Below we will see an example of checkmate and explain exactly why Black's King cannot escape!
Whenever a player moves a troop into square where the troop can see the enemy King, the player has created a check against their opponent's King.
In this case White has not only created a check, they've created a checkmate!
Whereas a check can be escaped, a checkmate is inescapable. Dodging, Apprehending and Disrupting cannot be used to escape the check.
Below we will show how there are no ways to escape White's check after Qh5 which means Qh5 is checkmate!

Here Black will attempt a Dodge Maneuver with their King to escape check by moving into g6. However, when the King moves into the g6 square the King will still be seen by White's Queen - an illegal move!

Black also CANNOT Dodge into the g5 square for this square is seen by BOTH White's Queen and White's Rook. This King will be moving into the sight of not 1, but 2, enemy pieces.

We understand chess is very complex. If you'd like some
live in person instruction to help learn the game click here to sign up for private one on one lessons.
White has a Battering Ram on the 5th Rank with the Queen and the Rook. Battering Rams in chess occur when 2 allied pieces are on the same Rank, File or Diagonal.
Because this pieces are on the same line of attack, if the pieces move along the line of the Battering Ram these pieces will protect one another as they move.
As an example here, either the White Queen or White Rook can move along the 5th Rank and still be seen by an allied piece.
This means when the Queen moves along the 5th Rank to check Black's King she will be continually seen by White's Rook so she does NOT need to worry about being Apprehended by Black's King.

Because the h5 square is on a Battering Ram for White's Rook and Queen this square is considering to be a Double Danger Zone.
Double Danger Zones are squares in the King's Throne seen by 2 pieces or
are squares that are within a Battering Ram of an enemy.
The reason these squares are called Double Danger Zones is because being threatened by 2 pieces, the King cannot capture the piece that moves into these squares.
For new players it's important to identify if squares next to the King are in fact Double Danger Zones for if they are not if you move a piece into a square next to the King it will be captured by the King!
Double Danger Zones are called Double Danger Zones because 1 piece can move into a square and is protected by another.
A King cannot Apprehend a piece that has moved into a Double Danger Zone because the King will be seen by the enemy.
Don't ever forget, a King cannot step into check.

Black realizes the Bishop move isn't going to work, so they will instead try to Apprehend White's Queen, but this too would be an illegal move!
The Black Knight is pinned to the Black King. If a piece is pinned to a King moving this piece would expose the King.
That's illegal!
If the Black Knight moves out of the f4 square the King will be exposed to the White Queen.
Exposing the King, even to stop a check, is still illegal!
We have looked at the ways for Black to escape check and have discovered there are no legal moves for Black to play - thus checkmate!
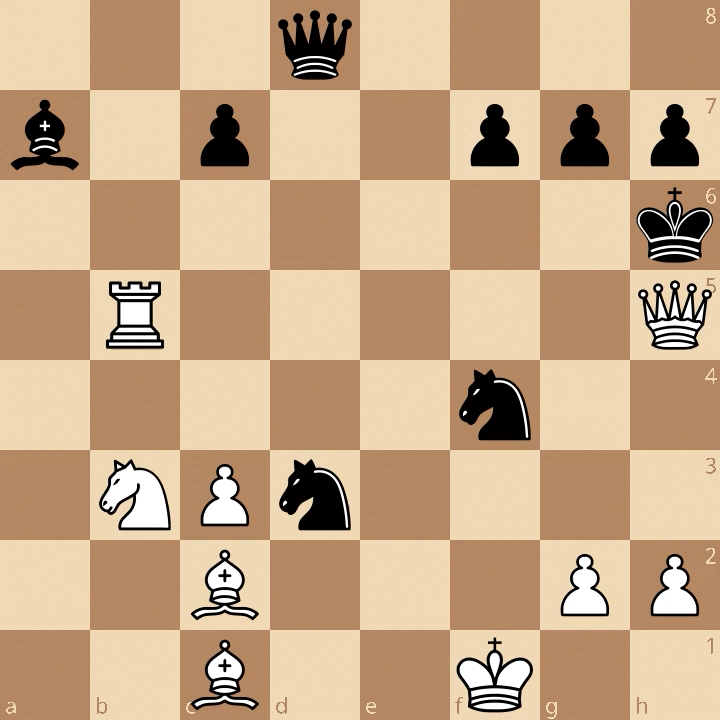
Here we show the final move for White which will end the game.
Don't get, after checkmate NO OTHER MOVES ARE PLAYED! The checkmating move is the final move of the game.

Now that the game is finished, shake hands with your opponent and say "Good game!". Then you can either switch sides for a rematch or find other friends to play a new game!
They say the best way to reinforce knowledge is by testing yourself with a solid challenge!
Click here to try and solve some basic 1 Move Checkmate Puzzles.
Email: support@chattanoogachessdojo.com
Phone: (423) 933-1995
Snail Mail:
4420 Oakwood Dr. #16055
Chattanooga, TN 37416

See the Chattanooga Chess Dojo's privacy policy at www.chattanoogachessdojo.com/privacy-policy